
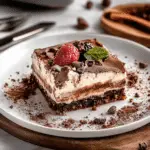
There’s something irresistibly nostalgic about Dirt Cake, a dessert that transports us back to childhood with its playful appearance and rich, creamy flavor. This easy no-bake treat combines layers of crushed chocolate cookies and creamy, fluffy filling, making it a favorite for kids and adults alike.

I first made this recipe as a fun treat for a family gathering, and it was an instant hit. Now, it’s a go-to dessert when I want something fun, delicious, and a bit whimsical – perfect for themed parties or a sweet surprise on any day.
Why You’ll Love This Dirt Cake
Get ready to fall in love with Dirt Cake, a dessert that’s as fun to make as it is to eat. This recipe is the ultimate crowd-pleaser, with layers of chocolatey goodness and a creamy filling that will keep everyone coming back for more.
First and foremost, Dirt Cake is incredibly easy to make. With no baking required, it’s the perfect recipe for hot days when you want a dessert without turning on the oven. Just a few simple steps and you’ll have a show-stopping treat ready in no time.
The flavor is rich and indulgent, thanks to the combination of chocolate sandwich cookies and a creamy pudding mixture. Each bite gives you that satisfying crunch from the cookies and the smooth, silky texture of the filling.
Another great feature? This dessert is perfect for themed parties! You can add gummy worms or edible flowers to make it look like real “dirt,” making it a hit for Halloween, kids' birthdays, or any occasion that calls for a bit of fun.
Plus, Dirt Cake is a make-ahead dessert. Simply prepare it the night before, and it’ll be perfectly chilled and ready to go when you need it. This is a dessert you can count on when you need something quick, easy, and impressive.
Ingredients Notes

The ingredients in Dirt Cake are simple and easy to find, but each one plays a role in creating that perfect combination of flavors and textures.
- Chocolate sandwich cookies: These form the “dirt” layer in our cake. Crush them finely to get a realistic dirt texture. Oreo cookies work great, but you can use any brand you prefer. For an extra chocolatey flavor, you could even try double-stuffed cookies!
- Cream cheese: This ingredient adds a subtle tanginess to the filling, balancing the sweetness of the pudding and cookies. Make sure it’s softened to room temperature so it blends smoothly with the other ingredients.
- Instant pudding mix: Vanilla pudding mix creates the base of the creamy layer, but feel free to use chocolate pudding if you want an even richer chocolate flavor. Just make sure it’s the instant type, as it sets quickly and holds up well.
- Whipped topping (Cool Whip): The whipped topping gives the filling its light and airy texture. You can substitute with homemade whipped cream if you prefer, but Cool Whip is convenient and works perfectly in this recipe.
- Milk: Needed to prepare the pudding mix, milk helps give the filling its creamy consistency. Use whole milk for the richest flavor, but any milk you have on hand will work.
You’ll also need a large mixing bowl, an electric mixer, and a serving dish or individual cups if you prefer to make mini Dirt Cakes.
How To Make This Dirt Cake

Making Dirt Cake is so simple, you’ll have it assembled and ready to chill in just a few steps.
Start by crushing the chocolate sandwich cookies into fine crumbs. You can use a food processor to make this quick and easy, or place the cookies in a zip-top bag and crush them with a rolling pin. Set aside about a cup of the crushed cookies to sprinkle on top.
In a large mixing bowl, beat the softened cream cheese until smooth and creamy. Add the instant pudding mix and milk, and beat again until the mixture is thick and fully combined. This creamy filling is the heart of your Dirt Cake, so take your time to ensure everything is well mixed.
Next, gently fold in the whipped topping until the filling is light and fluffy. Be careful not to overmix, as you want the filling to stay airy and creamy.
Now, it’s time to layer! Spread a layer of crushed cookies on the bottom of your serving dish, then add a generous layer of the creamy filling. Repeat these layers until you’ve used up all the filling, ending with a final layer of cookie “dirt” on top.
To finish, add some gummy worms or other edible decorations on top. For a fun garden effect, you can even add edible flowers or crushed chocolate-covered almonds to look like pebbles.
Storage Options
Dirt Cake is a great make-ahead dessert and stores well for several days in the refrigerator. Simply cover the dish with plastic wrap or transfer individual servings to airtight containers.
- In the refrigerator: Store Dirt Cake in the fridge for up to 3 days. The flavors will meld together beautifully, but keep in mind that the cookie layer may soften over time.
- In the freezer: While not necessary, you can freeze Dirt Cake for a firmer texture, almost like an icebox cake. Just be sure to allow it to thaw slightly before serving so the filling is creamy and not too hard.
When ready to serve, scoop portions into bowls or plates and add a few extra gummy worms on top for fun.
Variations and Substitutions
One of the best things about Dirt Cake is how adaptable it is. Try these variations to make it your own:
- Chocolate overload: Use chocolate pudding instead of vanilla for an even richer dessert. You can also add mini chocolate chips between the layers for extra texture.
- Minty fresh: Add a few drops of peppermint extract to the filling and use mint-flavored chocolate sandwich cookies for a fresh, minty twist.
- Healthier option: Swap the regular pudding mix with a sugar-free version and use light cream cheese and whipped topping to reduce calories. You could even layer in fresh strawberries or raspberries for added flavor.
- Make it mini: Serve Dirt Cake in individual cups for single servings. This is a great option for parties or for pre-portioned treats that are easy to grab.
With these fun variations, Dirt Cake can be adapted for any occasion or preference. Enjoy experimenting and creating your own twist on this beloved dessert.
PrintDirt Cake Recipe
This Dirt Cake recipe is a creamy, no-bake dessert with layers of chocolate pudding, cream cheese, and crushed Oreos. Perfect for parties, this nostalgic treat combines rich flavors and a smooth, crunchy texture that’s irresistible. Make it in minutes and enjoy an easy dessert with a playful look, topped with gummy worms for extra fun!
- Prep Time: 20 minutes
- Cook Time: 0 minutes
- Total Time: 20 minutes
- Yield: 10 servings
- Category: Dessert
- Method: No-Bake
- Cuisine: American
- Diet: Vegetarian
Ingredients
- 1 package of Oreo cookies, crushed
- 8 oz cream cheese, softened
- ¼ cup butter, softened
- 1 cup powdered sugar
- 2 boxes (3.4 oz each) instant chocolate pudding mix
- 3 ½ cups milk
- 1 container (12 oz) whipped topping (Cool Whip), thawed
- Optional: gummy worms for decoration
Instructions
- Crush the Oreo cookies in a food processor or in a bag with a rolling pin until fine.
- In a bowl, beat cream cheese and butter until smooth. Add powdered sugar and mix until combined.
- In another bowl, whisk the pudding mix with milk until thickened.
- Fold the pudding mixture into the cream cheese mixture, then fold in the whipped topping.
- In a large dish, layer crushed Oreos and pudding mixture alternately, beginning and ending with Oreos.
- Decorate with gummy worms on top if desired. Chill for at least 1 hour before serving.
Notes
- For extra fun, add small edible plants like mint to look like “grass” in the dirt.
- You can make individual servings in cups or mason jars for easy serving.
Nutrition
- Serving Size: 1 slice
- Calories: 450
- Sugar: 38g
- Sodium: 370mg


Leave a Reply