
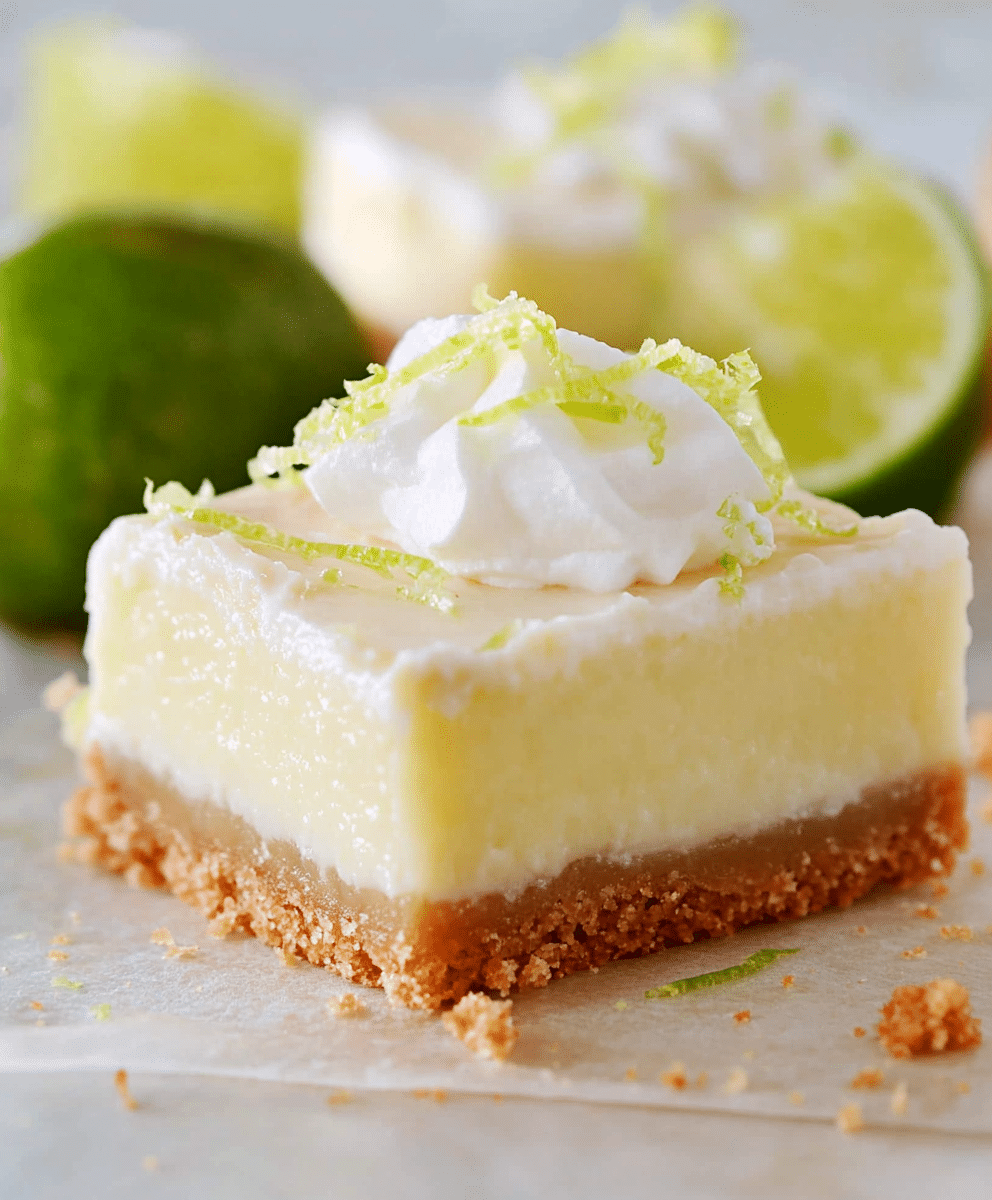
Key Lime Pie Bars are the perfect combination of zesty lime flavor, a smooth creamy filling, and a sweet, crunchy crust. This easy-to-make dessert is a crowd-pleaser that’s perfect for any occasion, whether you're hosting a summer barbecue or looking for a refreshing treat on a warm day. In this article, we'll walk you through every step of the process so you can create the most delicious key lime pie bars right in your kitchen. Follow along for an easy, foolproof recipe that will leave everyone asking for more.

What Are Key Lime Pie Bars?
Key Lime Pie Bars are a simplified, handheld version of the classic Key Lime Pie. They consist of three main layers: a buttery, crunchy crust made with graham crackers, a rich and tangy lime-flavored filling, and a topping of whipped cream or lime zest for garnish. Unlike traditional pie, these bars are baked in a rectangular pan and sliced into squares, making them portable and easy to serve at any event. The perfect balance of tartness from the key lime juice and sweetness from the condensed milk creates a mouthwatering dessert that's hard to resist.
Ingredients List for Key Lime Pie Bars
For the Crust:
- 1 ½ cups of graham cracker crumbs (about 10-12 graham crackers)
- ½ cup of unsalted butter, melted
- ¼ cup of granulated sugar
- A pinch of salt (optional)
For the Key Lime Filling:
- 1 can (14 oz) sweetened condensed milk
- 4 large egg yolks
- ½ cup freshly squeezed key lime juice (you can use regular lime juice if key limes are unavailable)
- 1 tablespoon of lime zest (optional, for extra flavor)
For Topping:
- 1 cup of whipped cream (homemade or store-bought)
- Additional lime zest for garnish (optional)
Substitutions and Variations
There are plenty of ways to customize your Key Lime Pie Bars depending on your taste or dietary needs.
- Crust Substitutions:
- If you prefer a gluten-free version, use gluten-free graham crackers.
- For a nutty twist, you can replace part of the graham cracker crumbs with finely ground nuts like almonds or pecans.
- Filling Variations:
- No key limes? No problem! Regular limes or even lemons can be used in place of key lime juice for a slightly different flavor profile.
- You can add a tablespoon of cream cheese to the filling for a richer, creamier texture.
- Topping Options:
- Instead of whipped cream, you can top the bars with meringue, similar to a lemon meringue pie.
- For a dairy-free option, coconut whipped cream works wonderfully as a topping.
Step-by-Step Cooking Instructions
Step 1: Preheat the Oven
Preheat your oven to 350°F (175°C). Line a 9x9-inch baking pan with parchment paper, leaving some overhang on the sides for easy removal of the bars later.
Step 2: Prepare the Crust
In a medium bowl, combine the graham cracker crumbs, melted butter, sugar, and a pinch of salt. Mix until the texture resembles wet sand. Press the mixture evenly into the prepared baking pan, using the bottom of a glass or measuring cup to pack it down firmly. Bake the crust for 10 minutes, then set it aside to cool while you prepare the filling.
Step 3: Make the Key Lime Filling
In a large bowl, whisk together the sweetened condensed milk, egg yolks, key lime juice, and lime zest until smooth and fully combined. The mixture should thicken slightly as you stir.
Step 4: Pour and Bake
Pour the lime filling over the cooled crust and use a spatula to spread it evenly. Bake for 15-18 minutes, or until the filling is just set and slightly jiggles in the center. Avoid overbaking, as this can cause the filling to crack.
Step 5: Cool and Chill
Allow the bars to cool to room temperature before transferring them to the refrigerator. Let them chill for at least 2 hours or until they are fully set.
How to Cook Key Lime Pie Bars: A Step-by-Step Guide
1. Preparing the Crust: The crust is a key part of any good Key Lime Pie Bar recipe, providing the perfect crunch to balance the creamy filling. Start by blending graham crackers into fine crumbs and mix them with melted butter and sugar. Make sure the crust is packed down tightly into the pan to avoid crumbling when you slice the bars later. Pre-baking the crust helps to firm it up, giving it that perfect texture.
2. Making the Filling: For the filling, the combination of egg yolks, sweetened condensed milk, and lime juice is magical. The acidity from the lime juice helps thicken the mixture naturally, which means no gelatin or additional thickening agents are required. Stir the ingredients together until smooth, ensuring that the lime flavor is evenly distributed.
3. Baking Time: Bake until the filling is just set. You want a slight jiggle in the center, similar to cheesecake, as it will firm up as it cools. Overbaking can cause cracks to form, which is something you want to avoid.
4. Cooling and Chilling: Allow the bars to cool at room temperature before chilling in the fridge. Chilling is essential for the bars to fully set and for the flavors to meld together. Don’t rush this step if you want perfectly firm, easy-to-slice bars.
Common Mistakes to Avoid
- Overbaking the Filling: The most common mistake is overbaking, which can cause the filling to crack and dry out. You want the filling to be slightly wobbly in the center when you take it out of the oven.
- Not Pressing the Crust Firmly Enough: If the crust isn't packed down tightly, it can crumble when you slice the bars. Use a flat-bottomed tool like a measuring cup to press the crust firmly.
- Skipping the Chilling Step: It's tempting to skip the chilling process, but your bars won't set properly without it. Chilling helps the filling firm up and makes it easier to slice cleanly.
- Using Bottled Lime Juice: Freshly squeezed lime juice provides the best flavor. Bottled lime juice can have a bitter, metallic taste that detracts from the overall flavor of the bars.
Serving and Presentation Tips
How you serve and present your Key Lime Pie Bars can elevate the entire dessert experience. Here are some ideas to ensure your bars look as good as they taste.
How to Serve Key Lime Pie Bars
- Chilled: Always serve Key Lime Pie Bars cold for the best flavor and texture. Keep them refrigerated until you're ready to serve, and slice them right before serving for the cleanest cuts.
- Portion Size: Slice your bars into small, even squares for a clean and elegant presentation. Each square should be about 2 inches, making them easy to pick up and enjoy.
Presentation Ideas for Key Lime Pie Bars
- Lime Zest Garnish: Sprinkle a bit of lime zest on top of each bar right before serving. It adds a burst of color and a hint of extra lime flavor.
- Whipped Cream Dollops: Add a dollop of whipped cream to each square for an extra touch of sweetness and creaminess.
- Citrus Slice Garnish: A thin slice of lime placed on each bar can make the presentation more vibrant and visually appealing.
- Mint Leaves: A few fresh mint leaves on top of each bar add a pop of color and make the bars look even more refreshing.
Key Lime Pie Bars Recipe Tips
- Use Fresh Lime Juice: Always use freshly squeezed lime juice for the best flavor. Key limes are preferred, but regular limes work just as well if you're in a pinch.
- Let the Bars Set Completely: Patience is key with this recipe. Let the bars set in the fridge for at least 2 hours, but overnight is even better for the flavors to fully develop.
- Make Ahead: These bars are a perfect make-ahead dessert because they need to chill. Make them a day in advance and store them in the fridge until you're ready to serve.
Frequently Asked Questions (FAQs)
Q: Can I use bottled lime juice?
A: While you can, fresh lime juice is highly recommended for the best flavor. Bottled lime juice tends to have a more acidic and less fresh taste.
Q: How long do Key Lime Pie Bars last?
A: They will last for up to 3 days in the refrigerator when stored in an airtight container.
Q: Can I freeze Key Lime Pie Bars?
A: Yes, you can freeze the bars for up to 1 month. Wrap them tightly in plastic wrap and aluminum foil before freezing.
Q: What is the difference between key limes and regular limes?
A: Key limes are smaller, tarter, and have a more intense flavor than regular Persian limes. However, both can be used in this recipe.
Conclusion
Key Lime Pie Bars are a fantastic, easy-to-make dessert that delivers bold citrus flavor in every bite. Whether you're a seasoned baker or just looking for a simple treat to share with friends and family, this recipe is sure to impress. Remember to use fresh ingredients, follow the steps carefully, and enjoy the deliciously tangy results! Serve them chilled, garnish with lime zest, and you’ve got a dessert that everyone will love.
PrintEasy Key Lime Pie Bars Recipe
Enjoy a delicious summer dessert with these Easy Key Lime Pie Bars. Made with a buttery graham cracker crust and a zesty key lime filling, these bars are the perfect balance of creamy and tangy. Ideal for gatherings or a light treat, they are easy to make and always a crowd-pleaser. Featuring key ingredients like fresh lime juice and sweetened condensed milk, this recipe will be your go-to for a refreshing citrus dessert!
- Prep Time: 15 minutes
- Cook Time: 30 minutes
- Total Time: 45 minutes
- Yield: 12 bars
- Category: Dessert
- Method: Baking
- Cuisine: American
- Diet: Vegetarian
Ingredients
- Graham crackers
- Unsalted butter
- Sweetened condensed milk
- Key lime juice
- Lime zest
- Egg yolks
- Sugar
Instructions
- Preheat oven and line a baking dish with parchment paper.
- Prepare the crust by mixing crushed graham crackers, sugar, and melted butter.
- Press the crust mixture into the bottom of the baking dish.
- Bake the crust for 10 minutes.
- Whisk together egg yolks, sweetened condensed milk, lime juice, and zest.
- Pour filling over the baked crust and bake for 15-20 minutes until set.
- Let the bars cool completely, then refrigerate for at least 2 hours.
- Slice into bars and serve chilled.
Notes
- Use fresh key lime juice for the best flavor.
- Bars can be stored in the refrigerator for up to 5 days.
Nutrition
- Serving Size: 1 bar
- Calories: 220 kcal
- Sugar: 18g
- Sodium: 120mg


Leave a Reply