
Halloween is the perfect time to get creative with your sweets, and what could be more fun (or spooky) than making Mummy Oreo Balls? These delicious, no-bake treats are made from crushed Oreos and cream cheese, coated in white chocolate, and decorated to look like little mummies. Whether you're throwing a Halloween party or just want a festive snack for your family, these treats will definitely be a hit.
In this article, we’ll guide you through the process of making these adorable Mummy Oreo Balls, from gathering your ingredients to decorating them with mummy “bandages.” We’ll also cover variations, serving suggestions, and tips to make sure your Mummy Oreo Balls come out looking spooktacular!

What Are Mummy Oreo Balls?
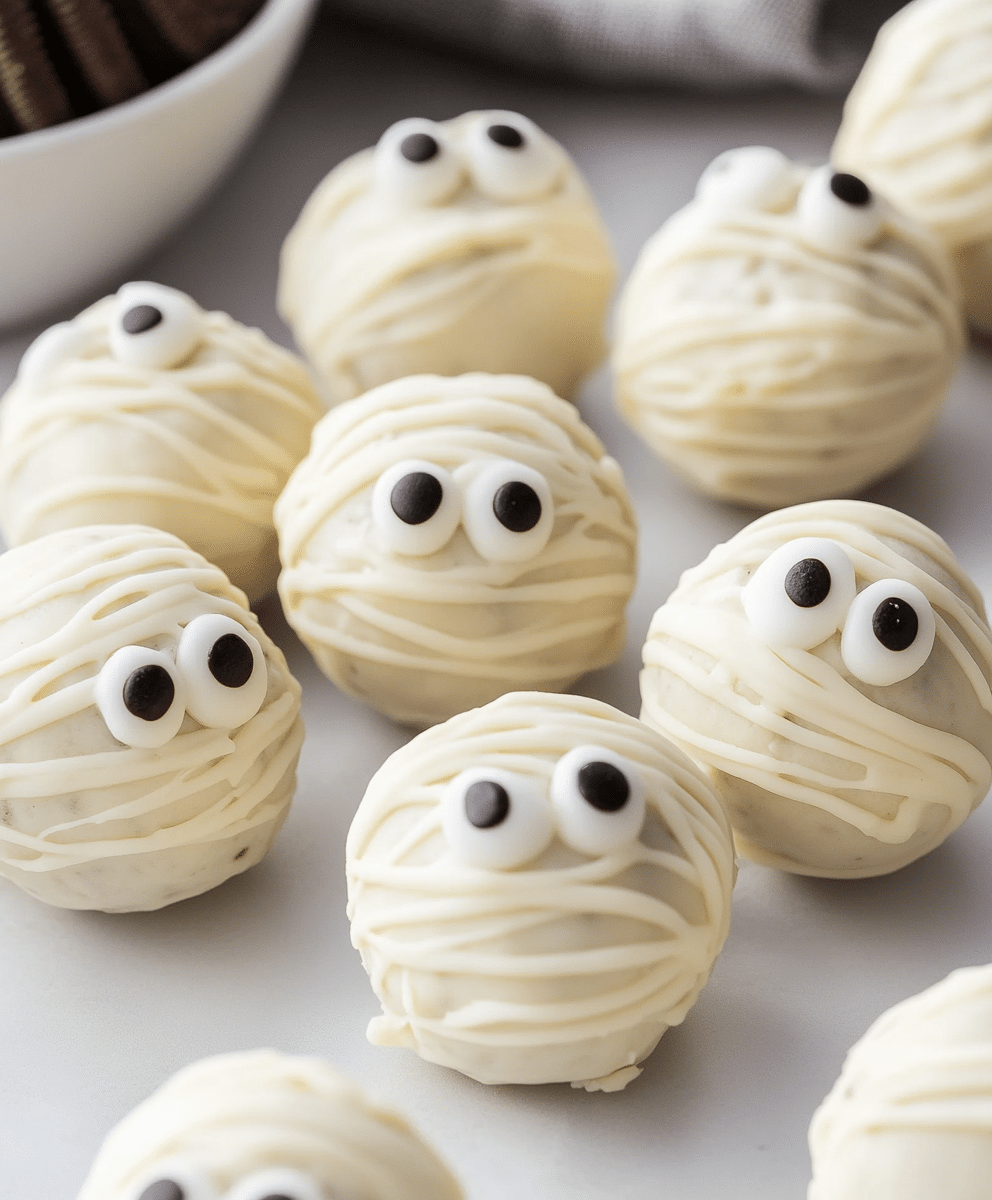
Mummy Oreo Balls are a Halloween-themed version of the classic Oreo truffles. They are made by mixing crushed Oreo cookies with cream cheese, rolling the mixture into balls, and dipping them in melted white chocolate. What makes them extra special for Halloween is the way they are decorated to look like little mummies. Using a drizzle of white chocolate or candy melts, you can create the "bandages" for the mummies, and candy eyes give them a cute (or spooky) face.
These no-bake treats are incredibly easy to make and are perfect for a Halloween party, as a gift, or just to enjoy with friends and family during the spooky season.
Ingredients List for Mummy Oreo Balls
Here’s what you’ll need to make about 24 Mummy Oreo Balls:
- 36 Oreo cookies: Use classic Oreos or any flavor you like. No need to remove the cream filling.
- 8 oz cream cheese (softened): This helps bind the crushed Oreos into a dough-like consistency.
- 16 oz white chocolate or white candy melts: For coating the Oreo balls and creating the mummy “bandages.”
- Candy eyes: These will bring your mummies to life! You can find candy eyes in the baking aisle of most craft or grocery stores.
- Optional decorations: Black decorating gel or colored sprinkles can add extra details if desired.
Substitutions and Variations
Want to mix things up a bit? Here are some variations and substitutions you can try:
- Flavored Oreos: You can use different flavors of Oreos, such as Mint, Golden, or Peanut Butter, to change the flavor of your Mummy Oreo Balls.
- Chocolate coating: If white chocolate isn’t your favorite, you can use dark or milk chocolate instead. Just note that it will change the appearance, but they’ll still taste delicious!
- Dairy-free option: Use a dairy-free cream cheese substitute and dairy-free white chocolate if you’re looking to make this recipe suitable for those with dairy allergies or vegan diets.
- Decorative touches: Add colored sprinkles to give your mummies a pop of color or draw tiny mouths on the mummies using black decorating gel to give them personality.
Step-by-Step Cooking Instructions
Now that you’ve gathered your ingredients, it’s time to make your Mummy Oreo Balls. Follow these simple steps to get started:
Step 1: Crush the Oreos
- Place the Oreos in a food processor and pulse until they turn into fine crumbs. If you don’t have a food processor, you can place the Oreos in a zip-top bag and crush them with a rolling pin. Make sure there are no large chunks left.
Step 2: Mix with Cream Cheese
- Transfer the Oreo crumbs to a mixing bowl. Add the softened cream cheese and mix together until well combined. You can use a spatula, hand mixer, or your hands to mix until the mixture forms a dough-like consistency.
Step 3: Roll into Balls
- Once the mixture is well combined, use a tablespoon or a small cookie scoop to portion out the Oreo mixture. Roll each portion into a ball with your hands and place them on a baking sheet lined with parchment paper or a silicone baking mat. You should get about 24 Oreo balls from this mixture. Place the tray in the freezer for 15-20 minutes to firm up.
Step 4: Melt the White Chocolate
- While the Oreo balls are chilling, melt the white chocolate or candy melts in a microwave-safe bowl. Heat in 30-second intervals, stirring between each, until smooth and fully melted. Be careful not to overheat the chocolate, as it can seize up.
Step 5: Dip the Oreo Balls
- Once the Oreo balls have firmed up, remove them from the freezer. Using a fork or dipping tool, dip each ball into the melted white chocolate, ensuring that it is fully coated. Let the excess chocolate drip off and place the coated Oreo ball back on the lined baking sheet.
Step 6: Add the Candy Eyes
- While the white chocolate coating is still wet, press two candy eyes onto the top of each Oreo ball to create the mummy’s face. Let the white chocolate harden completely before moving to the next step. You can speed up this process by placing the tray in the fridge for 10-15 minutes.
Step 7: Create the Mummy Bandages
- Once the coating is set, transfer any leftover melted white chocolate into a piping bag or zip-top bag with a small corner snipped off. Drizzle the white chocolate in a zigzag pattern over each Oreo ball to create the mummy’s “bandages.” Be sure to leave the candy eyes visible. Allow the drizzled chocolate to set completely.
How to Make Mummy Oreo Balls: A Step-by-Step Guide
- Crush the Oreos: Use a food processor or a zip-top bag and rolling pin to crush the cookies into fine crumbs.
- Mix with cream cheese: Combine the Oreo crumbs with softened cream cheese to form a dough-like consistency.
- Roll into balls: Shape the mixture into 1-inch balls and chill them in the freezer.
- Melt the white chocolate: Microwave white chocolate or candy melts in 30-second intervals until smooth.
- Dip the Oreo balls: Coat each Oreo ball in melted white chocolate and add candy eyes while the coating is still wet.
- Add mummy bandages: Drizzle melted white chocolate over the Oreo balls to create the look of mummy bandages.
- Let set and enjoy: Once the bandages are set, your Mummy Oreo Balls are ready to be served!
Common Mistakes to Avoid
- Overheating the chocolate: Be careful when melting your white chocolate or candy melts. Overheating can cause the chocolate to seize, making it unusable. Heat in short intervals and stir frequently.
- Skipping the freezing step: Don’t skip the step of freezing the Oreo balls before dipping them in chocolate. If they are too soft, they may fall apart when dipped.
- Too thick of a drizzle: When creating the mummy bandages, make sure your drizzle isn’t too thick. A thin zigzag pattern will make the mummies look more realistic.
Serving and Presentation Tips
To make your Mummy Oreo Balls stand out on the Halloween dessert table, consider these fun serving and presentation ideas:
- Halloween platter: Arrange the Mummy Oreo Balls on a black or orange Halloween-themed platter for a spooky presentation.
- Individual servings: Place each mummy in a mini cupcake liner to make them easy to grab and eat at a party.
- Monster party mix: Serve your Mummy Oreo Balls alongside other Halloween treats, such as gummy worms, candy corn, or chocolate-covered pretzels, for a fun Halloween dessert mix.
How to Serve Mummy Oreo Balls
Mummy Oreo Balls are best served chilled or at room temperature. They can be kept in the fridge until just before serving, especially if you’re making them ahead of time. Serve them on a platter for parties or wrap them individually in treat bags to give out as fun Halloween favors.
Presentation Ideas for Mummy Oreo Balls
- Spooky party tray: Place the Oreo balls on a spooky-themed tray surrounded by Halloween candy like gummy worms or eyeball-shaped candies for a fun display.
- DIY mummy faces: Let kids or guests decorate their own Oreo balls by providing extra candy eyes, sprinkles, and drizzled chocolate for a mummy-decorating activity.
- Halloween gift boxes: Package these Mummy Oreo Balls in small Halloween-themed boxes or bags for a cute and edible gift idea.
Mummy Oreo Balls Recipe Tips
- Thin out the white chocolate: If your white chocolate is too thick for dipping, add a teaspoon of vegetable oil or coconut oil to thin it out for a smoother coating.
- Make them ahead of time: These Mummy Oreo Balls can be made a few days in advance and stored in an airtight container in the refrigerator.
- Get creative with the bandages: You don’t have to stick to white chocolate—try using colored candy melts for more colorful and playful mummy designs!
Frequently Asked Questions (FAQs)
Q: Can I make Mummy Oreo Balls in advance?
A: Yes! Mummy Oreo Balls can be made a day or two in advance and stored in an airtight container in the refrigerator until ready to serve.
Q: How do I store leftover Mummy Oreo Balls?
A: Store the leftover Oreo balls in an airtight container in the refrigerator for up to 5 days.
Q: Can I freeze Mummy Oreo Balls?
A: Yes, you can freeze the Oreo balls (before decorating) for up to 2 months. Thaw them in the fridge and decorate as usual.
Q: What can I use instead of candy eyes?
A: If you
don’t have candy eyes, you can use mini chocolate chips, M&Ms, or even small dots of melted chocolate to create eyes.
Q: Can I use flavored Oreos?
A: Absolutely! Flavored Oreos like Mint, Peanut Butter, or Golden Oreos work great for adding different flavors to your mummy treats.
Conclusion
Mummy Oreo Balls are a fun, easy, and delicious treat that’s perfect for Halloween! With just a few simple ingredients and a little creativity, you can whip up these no-bake treats in no time. Whether you’re making them for a Halloween party, as a gift, or just as a fun family activity, these spooky mummy treats are sure to be a hit with everyone. So, gather your ingredients and get ready to make some creepy, cute, and irresistibly tasty Mummy Oreo Balls!
PrintMummy Oreo Balls Recipe

Mummy Oreo Balls are the perfect spooky treat for Halloween! These no-bake goodies combine crushed Oreo cookies and cream cheese, dipped in white chocolate and decorated with candy eyes and drizzled chocolate to resemble mummies. They're a fun and easy-to-make dessert that’s great for Halloween parties or as a festive snack for kids and adults alike.
- Prep Time: 30 minutes
- Cook Time: 30 minutes
- Total Time: 1 hour
- Yield: 24 mummy Oreo balls
- Category: Dessert, No-Bake Treats
- Method: No-Bake
- Cuisine: Halloween, American
- Diet: Vegetarian
Ingredients
- 36 Oreo cookies (crushed)
- 8 oz cream cheese (softened)
- 16 oz white chocolate or white candy melts
- Candy eyes
- Black gel icing or melted chocolate (for mummy details)
Instructions
- Crush Oreo cookies into fine crumbs using a food processor.
- In a large bowl, mix the crushed Oreos with softened cream cheese until well combined.
- Roll the mixture into 1-inch balls and place them on a lined baking sheet.
- Chill the Oreo balls in the refrigerator for 30 minutes to set.
- Melt the white chocolate or candy melts according to package instructions.
- Dip each Oreo ball into the melted chocolate and place it back on the baking sheet.
- Add candy eyes while the coating is still soft.
- Drizzle extra melted white chocolate over the balls to create mummy “bandages.”
- Let the mummy Oreo balls set completely before serving.
Notes
- Use a fork to dip the Oreo balls into the white chocolate for easier handling.
- Store in the refrigerator to keep them fresh.
Nutrition
- Serving Size: 1 ball
- Calories: 150
- Sugar: 12
- Sodium: 70mg


Leave a Reply